


In this article, I will be showing how to use Splash Screens in the Flutter app.
Note: A few resources to get you started if this is your first Flutter project:
For help getting started with Flutter, view Flutter's online documentation, which offers tutorials, samples, guidance on mobile development, and a full API reference.
Why Splash Screen?
- Gives the first impression of your app to the users.
- Branding.
- Gives you enough time to start up your application.
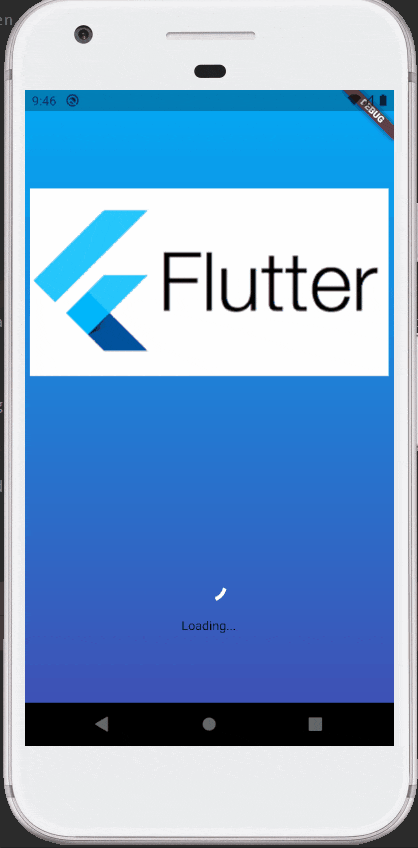
This is what we will be building
Complete Source Code can be found here .
Note: This article assumes readers have a basic understanding of how to run a Flutter application and Android Studio. If not please go through the articles mentioned at the beginning of the article.
Setup
Flutter provides splashscreen library to help with Splash Screen functionality.
Import splashscreen to the project by declaring it in pubspec.yaml.
dependencies:
  flutter:
    sdk: flutter
  splashscreen:
Directory Structure
Create below directories:
lib/src/views/ui/
lib/src/views/splash/
Home Screen
Create a file lib/src/views/ui/HomeScreen.dart, add the below contents.
import 'package:flutter/material.dart';

class HomeScreen extends StatelessWidget {
  @override
  Widget build(BuildContext context) {
    return new Scaffold(
      appBar: new AppBar(
          title: new Text("Flutter Sample App"),
          automaticallyImplyLeading: false
      ),
      body: new Center(
        child: new Text("Done!",
          style: new TextStyle(
              fontWeight: FontWeight.bold,
              fontSize: 30.0
          ),),
      ),
    );
  }
}
Main file
Replace the contents of main.dart with below,
import 'package:flutter/material.dart';
void main(){
  runApp(new MaterialApp(
    home: new MyApp(),
  ));
}
class MyApp extends StatefulWidget {
  @override
  _MyAppState createState() => new _MyAppState();
}
class _MyAppState extends State<MyApp> {
  @override
  Widget build(BuildContext context) {
     ...
  }
}
You can use Splash screens in Flutter in 2 ways:
Time-based
Use this if you want to show Splash screen for a fixed amount of time, maybe just to show up your Branding or Logo.
To define Time based Splash screen, create a file lib/src/views/splash/TimeBasedSplash.dart, add the below contents to it.
import 'package:flutter/material.dart';
import 'package:flutter_sample_app/src/views/ui/HomeScreen.dart';
import 'package:splashscreen/splashscreen.dart';
import '../../../main.dart';

class TimeBasedSplash extends State<MyApp>{

  @override
  Widget build(BuildContext context) {
    return new SplashScreen(
      seconds: 10,          // Load Splash screen for 10 seconds.
      navigateAfterSeconds: new HomeScreen(),       // Navigate to HomeScreen after defined duration.
      image: new Image.asset('assets/images/flutter_logo.png'),   // Load this image in the splash screen
      photoSize: 200,       // Size of the photo
      loaderColor: Colors.white,      // Color of Loading spinner
      styleTextUnderTheLoader : const TextStyle(fontSize: 18.0, fontWeight: FontWeight.bold, color: Colors.white),
     loadingText: new Text('Loading...'),
      gradientBackground: LinearGradient(   // Background color
        begin: Alignment.topCenter,
        end: Alignment.bottomCenter,
        colors: <Color>[
          Colors.lightBlue,
          Colors.indigo
        ],
      ),
    );
  }

}
Use time-based splash screen in main.dart,
import 'package:flutter_sample_app/src/views/splash/TimeBasedSplash.dart';

...

class _MyAppState extends State<MyApp> {
  @override
  Widget build(BuildContext context) {
    return new TimeBasedSplash().build(context);\
  }
}
Future based
Use this if you want to fetch some data through APIs to show on the home screen or your application needs some time to boot up.
To define Future based Splash screen, create a file lib/src/views/splash/FutureBasedSplash.dart, add the below contents to it.
import 'package:flutter/material.dart';
import 'package:splashscreen/splashscreen.dart';

import '../../../main.dart';
import 'package:flutter_sample_app/src/views/ui/HomeScreen.dart';

class FutureBasedSplash extends State<MyApp>{

  Future<Widget> loadFromFuture() async {
    // Fetch any value from server
    return Future.value(new HomeScreen());
  }
  @override
  Widget build(BuildContext context) {
    return new SplashScreen(
      navigateAfterFuture: loadFromFuture(),  // Which screen to show after loading
      image: new Image.asset('assets/images/flutter_logo.png'),   // Show this image during loading
      photoSize: 200,
      loaderColor: Colors.white,
      styleTextUnderTheLoader : const TextStyle(fontSize: 18.0, fontWeight: FontWeight.bold, color: Colors.white),
      loadingText: new Text('Loading...'),
      gradientBackground: LinearGradient(
        begin: Alignment.topCenter,
        end: Alignment.bottomCenter,
        colors: <Color>[
          Colors.lightBlue,
          Colors.indigo
        ],
      ),
    );
  }

}
Use time-based splash screen in main.dart,
import 'package:flutter_sample_app/src/views/splash/FutureBasedSplash.dart';

...

class _MyAppState extends State<MyApp> {
  @override
  Widget build(BuildContext context) {
    return new FutureBasedSplash().build(context);
  }
}